A recent poll carried out showed that the 2
most wanted tutorials were for CAS cards and for cards with created
backgrounds. This tutorial explores both and shows that with 8 sheets of
quality white card, some of the amazing Nuvo Mousse and the amazing Backyard
Blossoms you can create 5 elegant cards to show you care.
Using a damp sponge apply the pink flambe mousse to completely
cover one sheet of white card. Work quickly and smoothly using small circles to
blend the mousse. The mousse will form lines and shading as you apply. Further
areas of colour can be added to give more depth or create a speckled effect by
dabbing thicker amounts of mousse onto the card.
From the pink flambe cardstock cut 1 x 4.5" square and 1 x
3"x3.75" Die cut the 3rd largest circle and the lacy edge from the
lacy diamond die.
Stamp the gardens edge coneflower plus 2 flower heads and 2 of
the backyard blossom filler flowers in gray granite ink onto the leftover
coloured card. Cover the stamped images in clear embossing powder, remove
excess and heat to set. Die cut all the images.
Shape the coneflower using the flower shaping tools.
Layer the 2 additional flower heads onto the main flower, glue
the head of the flower - not the petals. Cover the head of the flower in glue
and sprinkle over the silver lining prills, remove excess and allow to dry.
Glue the 4.5" square pink flambe card to a 5" square
card base.
Cut a 3.75 square piece of white card. Stamp the sentiment
approx. 1" from the bottom of the card using memento ink, cover in clear
embossing powder, remove excess and heat to set. Mount the white sentiment card
onto the base card using foam pads and glue the coneflower into position using
dries clear glue.
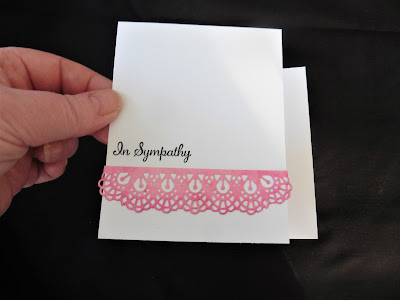
On a piece of 4.75" x 3.75" white card, stamp the
sentiment in black memento ink, and heat emboss with clear embossing powder as
with the previous card - approx. 1.5" from the bottom of the card. Glue
the lacy border into place under the sentiment, and mount the card onto a
4" x 5" card base using foam pads.
Cut the diecut filler flowers into 4 separate pieces.
Tie the filler flowers with linen thread and position onto the
card base using hot glue.
Cut a 5" square piece of white card. Diecut the 4th size
circle centrally in the white card approx .75" from the top of the card.
Stamp the coneflowers in gray granite onto the pink flambe
circle and heat emboss with clear embossing powder. Glue the circle onto the
base card so that it lines up to show through the aperture
Score 3 little lines of different lengths approx. .75" at
the bottom of the aperture card on both sides. Leave a gap for the sentiment to
be added, then stamp and heat emboss
"remembering with you" between the raised score lines and mount the
card to the base card using foam pads.
Stamp the Heartfelt Sympathy sentiment onto vellum using black
memento ink, cover with clear embossing powder, remove excess and heat to set.
Tear into an uneven sentiment strip approx. 1" wide x 4.5" in length.
Stamp the coneflower frame in gray granite ink and emboss, as
before, with clear embossing powder. Die cut.
Wrap the vellum sentiment around the 3" x 3.75" piece
of pink flambe card and glue into place at the back. Glue the coneflowers onto
the card to frame the edge of the pink flambe card and mount the sentiment
topper to a 5.5" x 6.25" white card base using foam pads.
Cut a piece of white card approx. 3.75" x 5.75" and
stamp the sentiment in the centre of the card using black memento ink. Cover in
clear embossing powder, remove excess and heat to set. Then mask off the centre
of the card using a glass mat grid
Swirl pink flambe mousse onto the top and bottom of the white
card. When dry, stamp the filler flowers onto the pink areas using gray granite
ink and heat emboss with clear embossing powder. Carefully remove the low tac
tape from the centre of the card, and adhere the card to a 6" x 4"
white card base.
Stamp a single backyard blossom and 2 flower heads in gray
granite onto white card and die cut. Shape and create the flower in the same
way as in the first card and add transparent glitter to some of the foilage on
the stem of the flower and glue the coneflower into position using wet glue.
ingredients:-
HCD1-7228 Lacy Diamond Die
Pink Flambe nuvo mousse
HCPC- 3848 Cheerful Note Sentiments Stamp Set
HCD1-7154 Eyelet Circle & Basics Small Die Set
HCPC-3828 Gardens Edge Coneflower Stamp set
HCD1-7182 Gardens Edge Coneflower Die Set
HCPC-3827 Backyard Blossoms Stamp set
HCD1-7181 Backyard Blooms Die Set
HCST1-401 Deluxe Flower shaping Kit
HCPP2-451 white cardstock
ANC806 silver lining prills
Clear embossing powder
Transparent glitter
Gray Granite ink pad – Stampin Up!
Linen thread
I hope I have inspired you?
If you would like to purchase supplies . . . . ..
please visit Heartfelt Creations by clicking HERE
The direct link for the mousse is HERE
Diamonds and Lace die - HERE
Backyard Blossoms Stamp set - HERE
Garden Edge Stamp set - HERE
Thank you for visiting my 2nd tutorial.
I hope you are inspired.
X


No comments:
Post a Comment