Pages

Wednesday 29 August 2018

We are still in Wedding Season - So I am sharing this card made using the Botanical Rose and the Classic Wedding Collection paper pad from  Heartfelt Creations

Heartfelt Products you need are:-
HCPC – 3651 Botanical Rose Stamp set
HCDA – 758 Botanical Wings die set
HCPC – 3835 Leafy Accents stamp set
HCD1 – 7193 Leafy Accents die set
HCFB1 – 467 3D Leafy Accents Shaping Mold
HCDP1 – 279 Classic Wedding Paper Collection
242174 Vellum
HCST1 – 401 Deluxe Flower Shaping Kit
ANC806 silver lining prills

 Other stuff:- 
Versamark, Ranger Bridal tinsel embossing powder, Tonic nuvo liquid mercury crystal drops , White card, Crystal gems, Toasted rose chalk cloud ink, Old Olive ink pad – stampin up, Mirri card, 1 -1.5” white lace, Double sided tape, Hot glue, Strong wet glue

This is what I did:- 

Score a 6.25” x 12.5” piece of white card at 6.25” to give you a square card base.

Cut  a 6” square piece of mirri card and a 5.75” piece of paper from the pad. Ink the edges of the paper with toasted rose and adhere to the mirri card.

Colour 2 x 7” strips of white lace with the chalk cloud ink and allow to dry. Once dry wrap around the card on 2 sides leaving a thin boarder of pattern paper showing. Secure in place with double sided tape and adhere to the card base using strong wet glue.

Make the leaves:- Stamp onto white card using the old olive ink and die cut. Place the die cut face down onto the shaping mold and spray with water. Place the lid of the mold on top and run through the die cutting machine. Remove from the mold and allow to dry.

Make the flowers:- Stamp in versamark and cover with bridal tinsel, remove excess powder and heat to set. Die cut the flowers and colour the reverse using chalk cloud ink. Shape the flowers using the flower shaping kit and adhere 2 layers of different sized petals together using wet glue. Add crystal drops to the centre of the flowers and sprinkle with prills – remove excess and allow to dry and harden.

Position the flowers and leaves onto the card using hot glue.

Cut the sentiment from the paper pad and shape. Add to the card using hot glue and add a small blossom at the top of the sentiment.
Thank you for popping by today.
X




Wednesday 22 August 2018

Not long now til the daisies will all have gone - so I've made a mini wreath to bring summer indoors.


HCPC – 3656 Delightful Daisies stamp set
HCD1 – 760 Delightful Daisy die set
HCST1 – 401 Deluxe Flower Shaping Kit
Available from Heartfelt Creations

8” polystyrene ring, 2” Lace edged hessian, Lace, Super smooth white paper, Spray bottle, Gilt trip prills, Stampin up! Inks – Granny apple green, daffodil delight, smokey slate, Bright gold nuvo crystal drops, Dressmaker pins, Hot glue

Wrap the hessian around the polystyrene ring holding it securely in place as you go with dress makers pins. Start and end at the top of the ring. Tie some lace around the bow, leave approx. 6” loop and tie a bow to hang the wreath with.

Make a lace bow and secure into place at the top of the wreath with hot glue.

Make the flowers:-

Stamp the daisies onto super smooth white paper in smoky slate ink and die cut. Snip away the paper which holds the petals together. Edge the flowers in Daffodil Delight and also colour the centres. Spray the back of the flowers lightly with water and shape using the flower shaping kit. Allow to dry. Fill the centre of each flower with nuvo drops and sprinkle with the prills. Allow to set thoroughly.

Make the leaves:-

Stamp onto super smooth white paper in granny apple green, die cut and colour in using sponge daubers with the granny apple green, also colour the reverse. Snip away the paper which holds the leaves together. Spray the back of the leaves lightly with water and shape using the flower shaping kit.

Arrange the flowers and leaves on the wreath using a hot glue gun.


Thank you for popping by today
X

Wednesday 15 August 2018


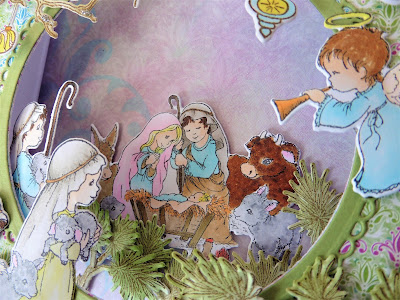
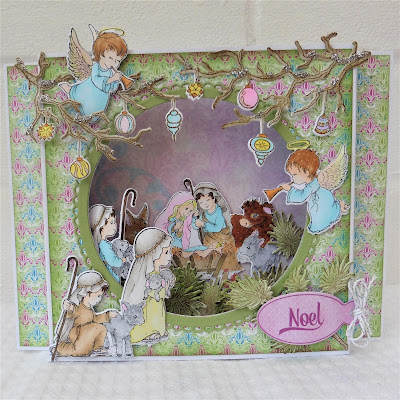
HARK THE HERALD ANGELS SING


GLORY TO THE NEW BORN KING

I've made this cute little aperture card using the Merry & Bright Paper with
the O Holy Night stamps and dies from
You will need:-
HCDP1 – 293 Merry and Bright Paper Collection
HCD1-745 Luggage and Tags die set
HCPC – 3837 Snowy Pine Village stamp set
HCD1 – 7195 Snowy Pie Village die set
HCPC – 3836 Merry Little Christmas stamp set
HCD1 – 7194 Merry Little Christmas die set
HCD1 – 7154 Eyelet Circle & basics Small
HCPC – 3832 O Holy night stamp set
HCD1 – 7187 O Holy night die set
HCST1 – 401 Deluxe flower shaping kit

And a few others bits:-
White card, white card for stamping, Black memento ink, Soft Suede, Highland Heather, Pear Pizzazz and Sahara Sand ink pad. Pear Pizzazz card stock– Stampin Up!, fine silver glitter, silver sparkly bakers twine, wet glue, Foam pads, hot glue

I coloured it with Copics:- Wings -Y00, RV00, Ox – E59, E35, chicken – R14, E43, Mary headdress – RV00, RV02, crib – E84, E43, shepherds headdress – Woo, W1,W3, W5, Skin – E000, E00, Shepherd – E31, E35, Shepherd 2 – W00, Y04, Y00, Shepherd 3 – B000, B00, B2, hair – E59


This is how I made it:-

Cut 2 pieces of white card 7.5” x 5” and score at 3.75”, 1.25”, 6.25” and 6.75”, fold the 2 inside score lines into a mountain fold and the outer score lines to make a valley fold.

Select the paper from the pad and cut a square slightly smaller than 5” and 2 strips the same height slightly less than 1.5”. Edge with Pear Pizzazz ink and adhere the square to the card front using wet glue, allow to dry. When dry, die cut a circle using the largest basic circle from the die set in the centre of the paper to form the aperture at the front of the card.

Make a Pear Pizzazz frame:- using the eyelet circle die cut the eyelet circle, then position the largest basic circle in the centre and die cut. Adhere the frame to the aperture you created on the card front.


Select a paper from the pad for the card background and cut a square slightly smaller than 5”, edge with Highland Heather ink and adhere to the back section of the card. Using the aperture on the front part of the card as a guide, position the nativity and secure into place with foam pads.


Adhere the 2 strips of paper to the front edges of the card and glue the front and back pieces of the card together.

Stamp the branches in soft suede onto white card and colour the branches in sahara sand ink. Colour the ornaments in copics to co-ordinate with the characters. Add glitter where  the snow is shown on the branches. Shape and add to the top of the card using wet glue.

Add the shepherds and angels using hot glue.

Die cut the sentiment and position at the front of the card with the remaining pine needles. Tie a sparkly bakers twine bow to finish.


 Happy Christmas in July
X

Wednesday 8 August 2018


HAVE YOURSELF A MERRY LITTLE CHRISTMAS 
I love the colours in this paper collection from HEARTFELT CREATIONS


Glistening winter scenes filled with freshly fallen snow, pine boughs draped with shiny holiday ornaments, and prancing reindeer delivering sleighs filled with handpicked gifts for friends and loved ones are delightful imaginings that send our imaginations dancing with delight in the anticipation of the holiday season! Spread a little Christmas joy and happiness featuring these warmhearted inspirations with the new Merry and Bright Collection from Heartfelt Creations! Share cheerful Yuletide greetings and well wishes with a fun and cutesy paper collection overflowing with precious outdoor scenes of cozy snow laden cottages, beautiful birds nestled in delightfully decorated pines, and pleasing decorative holiday arrangements! Brimming with delicate snowflake accents, gorgeous floral clusters, charming polka dots and beautiful brocade patterns all encompassed in a non-traditional color palette of frosty blues, tantalizing teals, magnificent purples and pretty pinks, this paper collection is one that will surely have your holiday projects standing out from all the others received this holiday season! A sweet and desirable assembling of cling stamp sets paired with the coordinating dies culminate a perfect assortment of illustrations including beautiful evergreen groves, rustic snow covered foliage accents, diminutive Christmas baubles and an elegant vase ideal for assembling your own decorative centerpieces! The perfect accents for creating delightful holiday themed dimensional embellishments for all of your Yuletide projects.

HEARTFELT SUPPLIES:-

HCDP1 - 293 Merry and Bright paper collection
HCPC – 3837 Snowy Pine Village stamp set
HCD1 – 7195 Snowy Pie Village die set
HCPC – 3836 Merry Little Christmas stamp set
HCD1 – 7194 Merry Little Christmas die set
HCD1 – 747 Arianna Lace die set
HCST1 – 401 Deluxe flower shaping kit

OTHER BITS YOU NEED:-
White card, Pear Pizzazz card, Old Olive, early espresso and Highland Heather ink (stampin Up!), Lilac Whisper Chalk Cloud ink (Cosmic Shimmer) transparent glitter, quickie glue pen, silver sparkly bakers twine, gems, hot glue, wet glue, Clear embossing powder, foam pads

 Create a 6.75” square card base using the white card, cut a 6.5” square of paper from the pad and add a deep edge with Chalk Cloud ink, add a fine edge of Highland Heather ink on top. Adhere to the card base.

Die cut 2 snowflakes in white from the Arianna Lace die set and colour using the 2 lilac inks to give a patchy effect, position onto the card using wet glue.

Select the paper for the centre topper and cut a square slightly larger than 3.5”, edge with Lilac ink shades as before. Stamp the sentiment in Highland Heather ink, run the quickie glue pen along the sentiment and add transparent glitter, remove excess. Adhere onto white card to leave a thin white border and add to the card base using foam pads.

Add random gems, using wet glue.

Create the pine needles:- Stamp the pine needles onto Pear Pizzazz card using Old Olive ink, colour the branches using early espresso ink and die cut 4 pieces of each sprig should be enough for this card. Shape the pine needles using the flower shaping kit. Add a little wet glue and sprinkle with transparent glitter, remove excess and allow to dry.

Create the decorations:- Stamp in Highland Heather ink and add clear embossing powder, remove excess and heat to set. Water colour the decorations using the same colour ink. When dry add wet glue and transparent glitter as with the pine needles, and allow to dry. Make bows with the bakers twine and add to the decoration using hot glue.

Position the pine needles and decorations using hot glue.
Thank you for popping by today.
please leave a comment to let me know you have visited.
X


Wednesday 1 August 2018


Love this little fella from  A Day For Daisies 
There are some beautiful images available
 
So easy to colour with my water colour pens.
And perfect to go with my Strawberry Swirl from Heartfelt Creations

The sentiment from Hunkdory says "do what you love".
He obviously enjoys eating strawberries!

Strawberry Swirl Stamp and Die Combo

Click HERE to buy your strawberries

Thank you for looking
X


CELEBRATE YOUR SPECIAL DAY
We are well into the Wedding Season at the minute
I just love the Sweet Peonies so much I had to turn them into a wedding card
The Sweet Peony Collection is available from
HEARTFELT CREATIONS


HEARTFELT SUPPLIES:-
HCDP1 250 Birds and Blooms Collection Paper Pad
HCPC – 3673 Heartfelt Sentiments stamp set
HCPC – 3821 Peony Bud and Blossom stamp set
HCD1 – 7175 Peony Bud and Blossom die set
HCPC – 3820 Large Sweet peony stamp set
HCD1 – 7174 Large Sweet Peony die set
HCPC – 3819 Small Sweet Peony stamp set
HCD1 – 7173 Small Sweet Peony die set
HCD1 – 776 Eyelet Oval Die set
HCD1 – 7156 Eyelet Oval and Basics Small die set
HCST1 – 401 Deluxe Flower Shaping Kit
HCDA2 - 450 stack and store daubers
HCFB1 – 464 3D Floral Basics Shaping Mold
HCS1 – 457 – 1 Pastel Pearl small stamens
HCS1 – 457 – 2 Pastel Pearl medium stamens

OTHER BITS YOU'LL NEED:-
White, Cream and Sahara Sand card (Stampin Up!), INK:- Soft Suede, Real Red, Poppy Parade (Stampin Up!), Pretty in Pink Cosmic Shimmer colour cloud, Autumn red nuvo drops, red fine glitter, clear embossing powder, COPICS:- G24, G40, YG63, YG67, R14, R35, R37, R39
Crochet ribbon, foam pads, wet glue, hot glue


Score a 10” x 5” piece of white card at 5” and fold in half. Score the front square diagonally corner to corner and fold the triangle up to give your easel card shape. Edge the square base and front triangle in chalk cloud ink.

Select the paper from the pad and cut a square slightly smaller than 5”, a triangle to match the front of the easel card and the largest basic oval from the eyelet oval die set. Edge all of the pieces in chalk cloud ink and adhere the square and triangle to the card.

Die cut the large eyelet oval in Sahara Sand card and add nuvo drops around the edge, cover in glitter and remove excess. Adhere the oval paper to the eyelet oval and mount onto the triangle using foam pads.

Cut a triangle of white card to fit on the base square, colour using chalk cloud ink and add a 2" lace ribbon around the card. Trim off the front point of the card and glue onto the base card using hot glue.


Stamp both peony blossoms onto cream card, also  2 large buds and 3 small buds in Soft Suede ink and colour using copics. Die cut and shape using the flower shaping kit.


Make the peonies:- Stamp the flowers onto cream card using soft suede ink and die cut. Add Real Red ink to the outer edges and Poppy Parade ink from the centre fading out to the edge using sponge daubers. Place face down into the flower shaping mold, spray lightly with water and run through the die cutting machine. Finish off the shaping using the flower shaping kit. Layer the petals together using wet glue - use 5 layers for the large flower and 3 layers for the smaller flowers. Make a hole in the centre of each flower and thread 10 stamens into the centre. Secure with hot glue. Add a small amount of wet glue to the edge of the flowers and sprinkle on glitter, remove excess and allow to dry.


Stamp the sentiment onto co ordinating paper using the real red ink, add clear embossing powder, remove excess and heat to set. Die cut into an oval using the basics small die set, edge with chalk cloud ink and curve slightly before adding to the card.

Position the flowers onto the card using hot glue.

Click here to head straight to the Sweet Peony Collection

Thank you for popping by today.

X