Pages

Saturday 30 June 2018

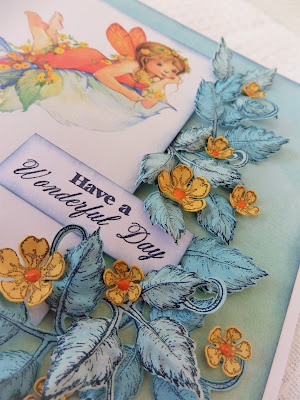
Another fairy card today
With the fabulous Leafy Accents and petunias 

The leaves and the centres of the petunias have all been glittered with transparent glitter.

So cute these images from Making Cards magazine, just perfect with these leafs and flowers.

If you are loving the leafy accents click HERE
Leafy Accents Bundle

For Petunias click HERE
https://www.heartfeltcreations.us/shop/product-collections/classic-petunia/classic-petunia-creative-essentials?tracking=5b349ddb55803


I am entering this little cutie on the Cute Card Thursday Challenge blog


Friday 29 June 2018

I am loving these fairies from Making Cards Magazine a few months back
I picked my papers and made a little topper mounted on yellow card.


I made some leaves using the Leafy accents stamp, die and mold combo and added some transparent glitter to make them sparkle, die cut 2 Fleur Borders to add either side of the topper and made some little petunias to add amongst the leaves.


Click HERE to shop leafy accents

or for Petunias click HERE
Classic Petunia Creative Essentials
If you fancy a Fleur Border click HERE


Fleur Border Basics Die


Thursday 28 June 2018

Leaves don't need to be green!

I made this using some free papers I had stashed away from Making Cards Magazine - Couldn't resist putting some  Heartfelt Creations Leafy Accents  with this little lass and a few small Wildwood flowers
This little fairy has the same beautiful hair as my daughter, will make
a perfect card for her.
And I just love the leaves in blue

https://www.heartfeltcreations.us/shop/flower-shaping-tools/3d-leafy-accents-shaping-mold?tracking=5b349ddb55803
Click  HERE to go to Heartfelt Creations shop


Wednesday 27 June 2018


Perfect for filling in or making a statement
I love these. . . . .


You will need:- 
HCPC – 3835 Leafy accents stamp set
HCD1 -  7193 Leafy Accents die set
Leafy Accents shaping Mold
HCDP1 – 290 Backyard Blossoms Paper Pad
HCD1 – 745 Luggage and tags die set
HCPC – 3769 Wildwood Florals stamp set
HCD1 – 7125 Wildwood Florals die set
HCPC – 3758 Encourage You Stamp set
HCS1 – 459 – 1 Assorted Pearl – small
HCS1 – 459 – 2 Assorted Pearl – Medium
Kraft card
White stamping card
Cosmic shimmer mist – rich gold
Stampin up Old Olive and night of navy ink
Cosmic shimmer cloud ink – Warm Cocoa
Prussian blue brusho
Cosmic shimmer cloud ink – summer sky
Cosmic shimmer white pearl pixie powder
Gold glitter
Clear embossing powder
Gold ribbon
Foam pads
Hot glue
Wet glue

How I made it:-

Score a 11.5” x  5 ¾” piece of kraft card in the centre to give a 5 ¾” square card base.

Cut a 5.5” square piece of white card and spritz with water, add a small amount of brusho and pixie powder, allow to dry. Blend Summer sky ink to any white areas. Edge the card and stamp the florals over the card with night of navy ink. Adhere to the card base.

Die cut a plain blue (sky) label from the paper pad. Stamp sentiment in night of navy, add clear embossing powder, heat to set. Thread the ribbon through the label hole and add to the card using foam pads.

Make the leaves:- Stamp the leaves in old olive ink and die cut. Place, upside down onto the shaping mold and spritz with water. Put the lid on the mold and run through the die cutting machine to shape. When dry spritz lightly with rich gold mist, allow to dry. Add a little warm cocoa ink to the edges of the leaves and set aside.

Make the flowers:- Stamp the flowers onto blue paper from the paper pad using night of navy ink. Add some shading using Summer sky and night of navy ink and die cut the flowers. Mist the back of the flowers with water and shape. Add a dot of glue to the centre of the smaller flowers and cover in gold glitter, allow to dry and remove  the excess. To make the bigger flowers use 2 layers and thread the small stamens through the centre.

Position the leaves and flowers using hot glue for the larger items and wet glue for the small flowers.

Thank you for joining me today.
If you need these leafy accents - you can buy them by clicking here 
Have a great week.
X


Wednesday 20 June 2018

Still loving the coneflowers
And now I have these lovely bees to go with them
from the Sweet as Honey Collection
YOU WILL NEED:-
Sweet as Honey Collection paper pad
HCPC – 3831  Sweet as honey stamp set
HCD1 – 7185 Sweet as honey die set
HCPC – 3826  Blossoming Coneflower stamp set
HCD1 – 7180    Blossoming Coneflower die set
HCPC – 3827 Backyard Blossoms stamp set
HCD1 - 7181  Backyard Blossoms die set
HCST1 – 401  Deluxe Flower Shaping Kit
242174  Vellum
5.5” white square card base, navy & white cardstock, black memento ink, black seed beads, Night of Navy/Pumpkin Pie/Daffodil Delight ink pads, Pool Party cardstock(Stampin Up!), Wow under the sea embossing glitter, versamark, diamond stickles, clear embossing powder, double sided tape, foam pads, hot glue, strong wet glue. Copics:- B000/V000(wings), B02/B04(bees bag), Y35 (pollen), N5 (legs) 

Select the paper from the pad and cut a  5 ¼” square piece, edge the paper with Pumpkin Pie ink and adhere to the card base using double sided tape

Die cut the hexagon mesh in Night of Navy cardstock, (you can line this up perfectly to create a big sheet of mesh), shape and cut to fit the side of the card base. Adhere onto the card base leaving some of the coloured hexagon print showing from the paper


To make the coneflowers:- Stamp the flowers in versamark and cover in embossing glitter, tap off excess and heat to set. You will need 3 flower heads for each flower. Colour the reverse of the flowers with Pumpkin Pie ink allow to dry and die cut. Gently shape the flowers using the Flower Shaping kit and glue 3 layers together to decoupage the petals. Use strong wet glue to cover the “cone” part of the flower and sprinkle with seed beads – allow to dry and remove any loose beads.
Stamp the bees onto white card in black ink and clear heat emboss. Colour the bees - I used copics and daffodil delight ink. Cover the wings in diamond stickles. Shape the bees using the flower shaping kit

Stamp the leaves and stems with Night of Navy ink onto Pool Party cardstock and die cut.

Stamp the sentiment in Pumpkin Pie ink and heat emboss using clear embossing powder. Die cut the sentiment using the hexagon die and edge with Night of navy ink. Position onto the card using foam pads.

Position the flowers and bees onto the card using hot glue and the leaves and stems using wet glue, shaping them as you decide where to position each piece.

Thank you popping by today.
X


Wednesday 13 June 2018

Life is busy and can “bee” overwhelming at times…and it’s in the middle of that chaos that you need to get “busy as a bee” with your creative side and refresh your soul with some fun and lighthearted art from the heart! The “bee-autiful” thing about creating art from the heart is that whether you’re needing to send “bee-lated” birthday greetings, remind someone to “bee-lieve” in themselves, or simply let someone know you’ll “bee” thinking about them, you’ve not only accomplished your act of kindness through remembering and touching the hearts of friends and loved ones with your creative projects, but you’ve refreshed your soul and refocused your heart as well! Join us in spreading joy and “bee-autiful” creations with the new Sweet as Honey Collection by Heartfelt Creations! “Swarming” with stunning illustrations of whimsical honey bees, charming hives and “bee-autious” garden scenes, this fun and lighthearted collection is ideal for creating projects for a multitude of occasions and is sure to capture the hearts of the young and the young at heart! A bright and happy hued paper collection will fill your soul with rays of warm sunshine yellows, bright sky blues and rich golden honey colors, while boasting captivating honeycomb patterns, happy hexagons, delightful polka dots, perfect plaids and dreamy florals! An assembling of three “bee-coming” cling stamp sets, along with coordinating dies provide endless inspirations with a “bee-autiful” colony of honey bee maidens, whimsical hives and sweet sentiments ideal for pairing with honeycomb die cuts! So, now that you know what all the “buzz” is about, join us in “bee-ing” Sweet as Honey and sharing “bee-autiful” art from the heart wherever you go!

Sweet As Honey
This is such a colourful collection


This is what I used, and how I made this card

Sweet As Honey Collection Paper Pad
HCD2 – 7191 Intricate Swirl Frames Die
HCPC-3830 Honey Bee Bungalows stamp set
HCD1-7184 Honey Bee Bungalows Dies set
HCPC-3829 Honey Bee Maidens Stamp set
HCD1-7183 Honey Bee Maidens Di set
HCPC-3831 Sweet as Honey Stamp set
HCPC-3769 Wildwood Florals Stamp Set
HCD1-7125 Wildwood Florals Die set
HCST1-401 Deluxe Flower Shaping Kit
Black card, white card, Gold cosmic Twinkles, gold embossing powder,clear embossing powder, black memento ink, Pumpkin liquid pearls, versamark, wet glue, hot glue, double sided tape, foam pads.

Copics:- W00, W1, W3 & W5(skin and honey jar), E000 & V000 (wings), E18 & E37 (honey spoon), Y13, Y32 & Y35 (hair), YR04, YR15, YR16, YR18 & YR18


Score a 14” x 10” piece of white card at 7” and 3 ½” to give you a 7” x 5” card base with a mountain fold.

Cut a black piece of card slightly smaller than 7” x 5” and adhere to the base card. Select papers from the paper pad and cut another slightly smaller rectangle to layer onto the black card. Use a 1 ½” strip of the paper and layer onto a slightly thicker piece of black, then white card and adhere this strip to the base card using foam pads proximately ½” from the front edge of the card.

Die cut the Large Intricate Swirl frame in black card and add the paper to the centre of this using double sided tape. Adhere to the front of the mountain fold on your card and sit it against the strip of card across the front base.

Die cut the centre piece from the Intricate Swirl Frames set and add to the card using foam pads.
 Stamp and colour the Maidens and honey jar. Make two sets of wings and an additional skirt so that you can decoupage these and add dimension. Die cut  and lightly shape the images and add to the card using hot glue.

Stamp in black ink onto the co -ordinating paper and clear heat emboss some Wildwood florals. Stamp another set of florals onto black card with versamark and heat emboss with gold embossing powder, add gold cosmic twinkles to the black flowers using a paint brush. Die cut and shape all the flowers.
Stamp some leaves onto some green paper from the pad, die cut and shape.

Stamp the sentiment in black ink onto white card, and heat emboss using clear embossing powder, cut to size and layer onto black card, a larger piece of co ordinating card stock and a final layer of black card.

Use a hot glue gun to position the sentiment, flowers and leaves around the base of the card. When the glue has cooled add a dot of liquid pearl to the centre of each flower.

Wouldn't it be lovely if bees really did look like this?

Thank you for being here today.
X


Wednesday 6 June 2018

I've returned to my Sweet Peony Collection today
to show you my first attempt with Art Foam flowers.
Here's how I made it 

Score  a 15” x 5.5” piece of white card at 7.5” to give you a 7.5” x 5.5” card base. Create a chalk cloud ink border around the edges of the front of the card, approximately 1” deep.

Die cut the intricate swirl frame in Crumb Cake card and adhere to the card base.

Spray a light cover of water over the hammered card (I started with an A4 sheet), and sprinkle Pewter and  Teal Wash pixie powder, allow the colours to blend and add more water if necessary. When dry cut a piece of the card 5 ¾” x 3 ¾”, edge with soft suede ink.

Die cut the smaller intricate lace frame and adhere to the pixie powdered card. Secure co-ordinating ribbon across the top of the card and mount onto the base card using foam pads.

Make the Sweet Peonies:- Stamp the Sweet Peonies onto art foam paper using early espresso ink and die cut. Heat the foam using a heat gun – hold the foam secure in the centre with a  ball tool – and shape before completely cooled. Layer 2 or 3 die cuts to create the flower and make a hole in the centre to pass the stamens through (fold 3 stamens in half, thread a wire or strong cotton thread from the back of the flower, over the centre of the stamens and back into the flower. Pull the stamens through and secure with hot glue).
Make a bow with the co ordinating ribbon attach to the card using hot glue and secure the peonies and buds around it using the hot glue. Hold the flowers in place until the glue has set, twist the ribbon and trim the ends.

Select the sentiment strip from the paper pad, cut to size and layer onto a strip of crumb cake card, add to the base card using foam pads
This is your shopping list!:-
HCDP1-288 Sweet Peony Collection Paper Pad
HCD2 – 7191 Intricate Swirl Frames die set
HCPC – 3820 Large Peony stamp set
HCD1 – 7174 Large Sweet Peony die set
HCPC – 3819 Small Sweet Peony Stamp set
HCD1 – 7173 Small Sweet Peony die set
HCFS1 – 465 Art Foam paper
HCS1 – 459 – 2 Pearl Stamens
HCS1 – 459 – 1 Pearl Stamens
 White cardstock, Hammered Cardstock, Pewter Pixie Powder, Teal Wash Pixie Powder, Co-ordinating ribbon, Cosmic Shimmer Frosted Aqua Chalk Cloud ink, Crumb Cake ink and cardstock – Stampin Up!, Early Espresso ink – Stampin Up!, Heat gun, Wet glue, Foam pads, Hot glue, Water mister


Thank you for a moment of your time.
X

Sunday 3 June 2018

This stamp set from Stampin Up! is so versatile

BEAUTIFUL DAY

Mix it with pixie powders or brushos

Use the amazing Pattern Party masks with them
 Get your white embossing powder out.

then add the easy to use, quick to dry embossing paste

So much you can do with one stamp set.

How will you use this set?
X

Friday 1 June 2018

This month the 2 Crafty Critter Crazies  are sponsored by Sparkle and Sprinkle
I couldn't resist this little bug in the jar.

Find him HERE

I printed the bug onto some paper I had in my stash
I coloured them using copics (R21 & YG06) and mounted them on some bright orange card.
The jar was coloured with R00 & R000 and the cloth top E35 and E33 - 
Than I wound some bakers twine around it and added it to the card using foam pads.
The sentiment was written in word, printed off and mounted onto the orange.

What a grumpy, but loveable, bug!
X